Knowledge Base
Getting Started with DailyMag
New to WordPress or want to refresh, remember to check out the WordPress Training Videos (must be logged in to view)
Table of contents
- Installation
- Customize
- Featured Content
- Layouts
- Menus
- Widgets
- Adding Social Links
- Theme Measurements
Installation
Add DailyMag Theme
- From the Dashboard of your site, go to Appearance → Themes.
- Click the Add New button at the top of the screen.
- Click the Upload Theme button at the top of the screen.
- Select Choose File and find the .zip file of the theme, select it, and click Add, followed by Install Now.
- The theme will upload then ask whether you would like to Activate, view a Live Preview, or Return to Theme page. You can activate or view the theme from this screen or do it later in the Appearance → Themes screen.
Setup Automatic Updates
Automatic updates will enable you to know when bug fixes and updates have been pushed by the development team, and provide a notification in the WordPress Dashboard when they are available. The license key must be renewed annually to continue to receive bug fixes, updates.
Warning:
Be aware that if you have made any modifications to the CSS or PHP files and run an update, all changes will be blown away! We highly suggest if you want to make theme modifications to do so by creating a Child Theme.
- From the Dashboard of your site, go to UpThemes.
- Paste the License Key you received in the purchase email from UpThemes into the License Key field.
- Click Save Changes.
- Click Activate. You will see a green “active” marker if the license key was entered successfully. If not, please email support for assistance.
Customize
Show your personality off and make your site reflect you. The DailyMag Theme offers a number of options to make your site unique from the Live Customizer. The Customizer can be found under Appearance → Customize.
Site Identity
Set the Site Title, Tagline, and Site Icon for your WordPress site.
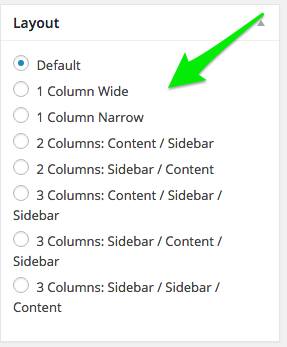
Layout
Choose from seven layout options to set your Global Layout.
Color
Set a custom color for the Background Color.
Background Image
Add a custom Background Image to the site and specify its positioning and whether it should tile.
Menus
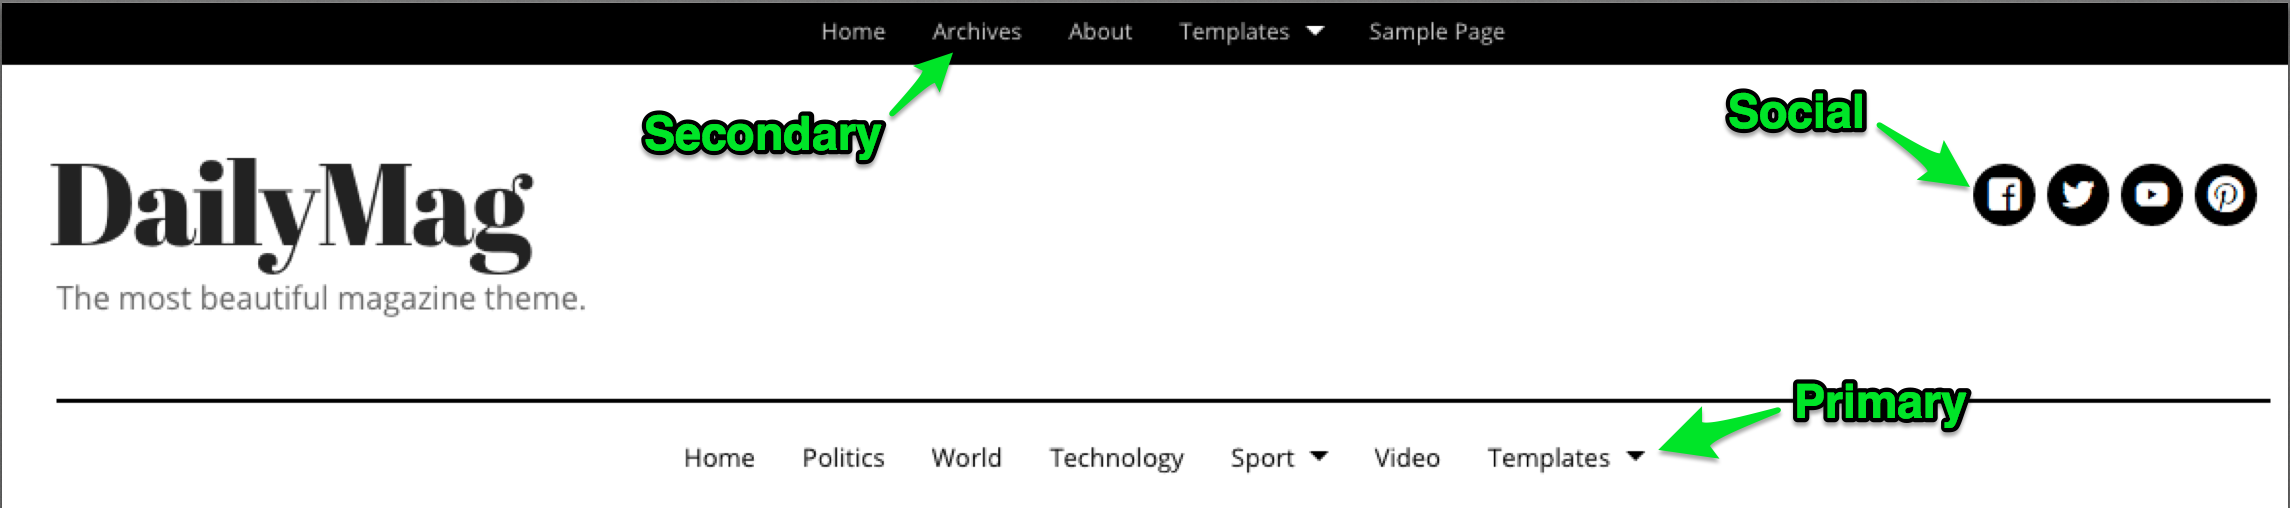
There are three menu areas; primary, secondary, and social. Here you can set up the Menus from the Customizer if you like.
Widgets
Setup widgets in the five available zones.
Static Front Page
Choose Your latest posts to display posts on the homepage.
Featured Content
Set up the tag for the Featured Content and manage Featured Content options. For more about the Feature Content check out Setup Featured Content. (see below to see how to set up, must have Jetpack)
Featured Content
Showcase articles to make sure they get the attention they deserve by setting featured content.
Setup Featured Content
- From the Dashboard of your site, first activate Jetpack by going to Plugins → Add New → Search for Jetpack →Activate
- Go to Appearance → Customize.
- Expand the Featured Content section in the Customizer.
- Add a word to the Tag Name field, we suggest using the word featured to keep things simple since this is for Feature Content.
- You also have several customization options here, you can hide the custom tag from displaying in post meta and tag clouds and to display tag content in all listings.
- Click the Save & Publish button and Close the Customizer.
- Go to the Blog Post that you would like to add, and add a tag using the custom word from Step 3 (we suggested using the word featured).
- Update the Post and head over to the homepage of your site to check out the super duper awesome Feature Content!
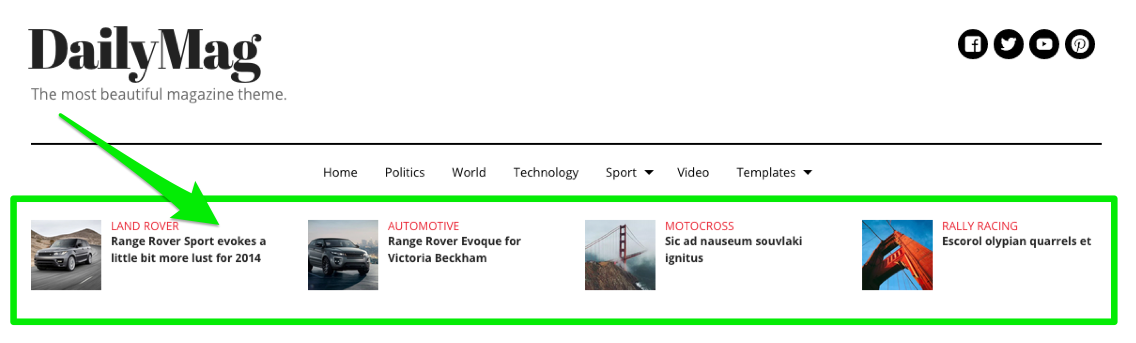
Here’s where your Featured Content will show:
Four featured items on homepage below primary navigation:
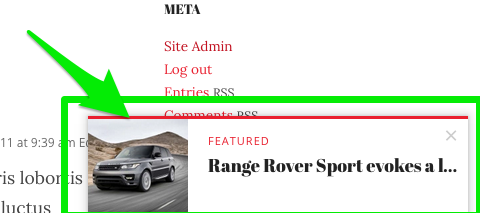
When on an article a small pop up at the bottom right will appear:
Featured Images
The image that will show up in the Featured Content on the Homepage is whatever image that is set as Featured Image on a Blog Post.
- Open the Blog Post you would like to add to the Featured Content.
- Along the right side column you will see a Featured Image block, click the Set featured image link.
- Upload an image or navigate to an image in the Media Library.
- When you select the image you like press the Set featured image to confirm.
- Press the Update button to save any changes. Remember, the Blog Post must have the correct tag associated with it for the item to be displayed in the Featured Content.
Layouts
As you saw above in the Customizer you can set a layout for your entire site for the Global Settings. You can also change the layout of your Pages and Posts with the same seven options.
- Go to a Post or Page
- You will see on the right column a layout box
- Choose the layout you would like and be sure to Save or Publish the Page or Post
Menus
DailyMag has three menu areas:
Setting up a custom menu
- Click Appearance → Menus.
- Click Create New Menu.
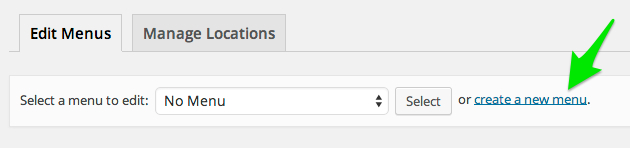
- Enter a menu name.
- Add menu items from the left side of the page.
- Check the box next to the menu you want to create within Menu Settings.

- Make sure to click Save Menu before leaving the page.
Adding Social Links
Add all your favorite social icons to show people where they can find you.
Create Social Menu
- Click Appearance → Menus.
- Click Create New Menu.
- Enter a Menu Name.
- Click Create Menu.
- To the left of Menu Structure, click the Links tab.
- Enter the link to one of your social media profiles in the URL field and add whatever Link Text you like (Ex: Upthemes on Twitter). Click Add to Menu.
- Add any other social links the same way.
- In the Menu Settings section, check the box next to Social.
- Click Save Menu.
Widgets
There are three footer widget zones:
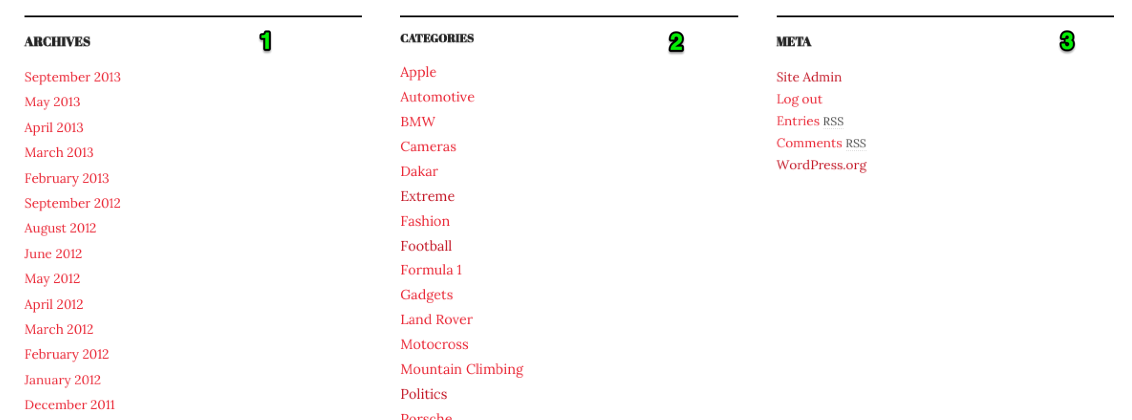
There are two sidebar widget zones. The primary sidebar appears alongside the content of every page, post, archive, and search template. The secondary sidebar will only appear when you have selected a three-column layout.
You can add widgets to these areas by going to Appearance → Widgets
Theme Measurements
Quick Specs (all measurements in pixels)
- The main column width is 760 in the one-column (skinny) layout.
- The main column width is 1140 in the one-column (wide) layout.
- The main column width is 845 in two-column layouts.
- The main column width is 550 in three-column layouts.
- Sidebar width is 760 in the one-column (skinny) layout.
- Sidebar width is 1140 in one-column (wide) layout.
- Sidebar width is 255 in two-column & three-column layouts.
- The featured image has a max width of 914 and max height of 487 in the one-column (skinny) layout.
- The featured image has a max width of 1520 and max height of 810 in the one-column (wide) layout.
- The featured image has a max width of 1690 and max height of 900 in two-column layouts.
- The featured image has a max width of 1100 and max height of 586 in three-column layouts.