Knowledge Base
Getting Started with Amplify
Table of contents
- Overview
- Markup
- Styles
- JavaScript
- FlexSlider
- Photoshop file
- Installation
- Homepage Setup
- Setup AudioTheme Pages
- AudioTheme Features
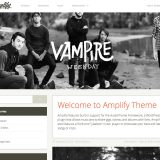
Overview
The Amplify Theme uses the AudioTheme WordPress plugin that adds discography, gig, and video management to your website. This theme was built to support the latest version of AudioTheme, offering a site-wide jukebox, multiple page layouts, and theme options to customize the look and feel of your website.
Markup Markup customization and highlights
Please note that we do not support themes that have been heavily modified so we recommend using a child theme for any custom changes or style updates.
This theme is a responsive layout with two columns. All of the information within the main content area is nested within a div with an id of “main.” The sidebar’s (column #2) content is within a div with an id of “secondaryContent”.
General Markup
The general template structure is the same throughout the template. Here is the general structure:
<!DOCTYPE html>
<html xmlns="http://www.w3.org/1999/xhtml" lang="en-US">
<head>
<meta http-equiv="Content-Type" content="text/html; charset=UTF-8" />

<title>Title</title>

</head>
<body>

    <div id="wrapper">

    <header id="masthead">

        <div class="top-bar-container contain-to-grid fixed">
            <nav class="top-bar">
                <ul class="title-area">
                    <li class="name">
                    <h1 id="logo">
                        <a title="#" href="#"><img src="#" alt="Title"/></a></h1>
                    </li>
                    <li class="toggle-topbar menu-icon"><a href="#"><span>Menu</span></a></li>
                </ul>
                <section class="top-bar-section">
                <ul id="menu-main" class="top-bar-menu left">
                    <li class="divider"></li>
                    <li class="menu-item menu-item-type-post_type"><a href="#">Menu Item</a></li>
                </ul>
                </section>
            </nav>
        </div>

    </header>

    <div id="container" class="clearfix">

        <div id="main">

        <div id="content">
        </div><!-- /#content -->

        <div id="secondary" class="widget-area" role="complementary">
        </div><!-- #secondary -->

        </div><!-- /#main -->

    </div><!-- /#container -->

    <div id="footer">
    </div><!-- /#footer-->

    </div><!-- /#wrapper -->

</body>
</html>
How To Edit Color
If you would like to edit the CSS of an element in the main content area, you would add the following custom CSS using the custom CSS manager plugin:
#content a {
     color: #someColor;
}
Change Structure
If you find that your new style is not overriding, it is most likely because of a specificity problem. Scroll down in your CSS file and make sure that there isn’t a similar style that has more weight.
#main #content a {
     color: #someColor;
}
Styles Style customization and highlights
This theme utilizes a CSS pre-processor called Sass. It also uses Compass, a library for Sass. To learn about editing Sass files, check out this tutorial. Sass and Compass are fantastic new tools for writing better CSS.
Stylesheets
Here’s a list of the Sass files within this template, located in the /sass/ directory. These files, when compiled, will overwrite the style.css file. You can find more information opening each file:
| File Name | Description |
|---|---|
_audiotheme.scss |
Styles specific to AudioTheme integration. |
_buttons.scss |
Styles for buttons throughout the theme. |
_clearing.scss |
Styles used for clearing floats. |
_comments.scss |
WordPress comment styles. |
_discography.scss |
AudioTheme discography styles. |
_flexslider.scss |
FlexSlider styles (image slider). |
_footer.scss |
Styles specific to the footer of this theme. |
_forms.scss |
Styles for common form elements. |
_genericons.scss |
Generic icon font, GPL-licensed. |
_gigs.scss |
AudioTheme gig styling. |
_global.scss |
Sitewide styles. |
_grid.scss |
Styles for grid layout. |
_icons.scss |
Icon styles. |
_layouts.scss |
Layout styles. |
_normalize.scss |
Instead of a reset CSS file, we use a normalize file. |
_pages.scss |
Styles for WordPress pages. |
_pagination.scss |
WordPress pagination styles. |
_post.scss |
Post-specific styles. |
_rtl.scss |
Right-to-Left language support. |
_sidebar.scss |
Sidebar styling. |
_top-bar.scss |
Top bar navigation styles. |
_type.scss |
Typography base styles. |
_variables.scss |
Foundation variables. |
_videos.scss |
Video and media styling. |
_widget.scss |
WordPress widget styles. |
_wordpress.scss |
Styles required by WordPress. |
editor-style.scss |
Required for visual WYSIWYG editor. |
print.scss |
Printed styling. |
style.scss |
This is the master file that bundles all other files into itself. |
Sass/Compass Configuration
The configuration file for Sass and Compass is in the top-level directory of your theme folder and is named config.rb. You can edit this file if needed but it is generally recommended to leave it alone. Once you have installed Ruby and Sass/Compass, you will want to watch for changes in your theme folder by typing “compass watch” in the command line after accessing the theme folder.
JavaScript JavaScript customization and highlights
JavaScript Files
| Tag | Description |
|---|---|
scripts/foundation.js |
Foundation javascript is contained within this file, which is necessary for certain features of Foundation to work properly. |
scripts/foundation.topbar.js |
This file adds drop-down cross-browser functionality to the theme. |
scripts/init.js |
Initializes the custom AudioTheme players and other important features. |
scripts/plugins.js |
This file contains some minified jQuery plugins which make the theme more cross-browser/device/screen-size friendly. |
FlexSlider a super cool image slider
Customize FlexSlider
If you want to change the slider’s speed transition or other properties, open up the file inc/responsive-slider/responsive-slider.js and change the following code:
        /* Flex Slider. */
        jQuery('.flexslider').flexslider( {
        animation: $slidereffect,
        slideshowSpeed: $sliderdelay,
        animationDuration: $sliderduration,
        slideshow: $sliderstart,
        pauseOnHover: true,
        smoothHeight: true,
        easing: "inOutExpo",
        controlNav: false
        } );
You can find a list of options and available properties for FlexSlider here.
Photoshop File Photoshop customization and highlights
We’ve included one PSD with this theme:
Amplify Theme Main
Contained within this PSD are multiple screens seen throughout the Amplify theme.
This file is provided for you to make changes for clients to obtain approval. You will be required to slice and export images on your own, we do not provide any pre-sliced areas or support for changes made within Photoshop.
Installation How to Install the Template
Here’s a quick guide for installing your new WordPress theme.
Set up AudioTheme
- Download the latest version of AudioTheme plugin.
- You may purchase a license for AudioTheme if you would like automatic updates and support. This is recommended but not required.
- If you uploaded the AudioTheme plugin to your content directory then the AudioTheme plugin will be in the available plugins list at Plugins → Installed Plugins.
- Simply click activate.
- If you did not upload the AudioTheme plugin to your content directory you can upload it by going to Plugins.
- Then click Add New
- Then click Upload
- Select the AudioTheme plugin zip folder and click upload.
- Important! Once you have the AudioTheme plugin installed on your WordPress instance make sure to activate.
Install Amplify Theme
- Make sure to first unzip the downloaded ZIP file to your desktop, then find ‘amplify-theme.zip’ inside the newly created folder.
DO NOT TRY TO INSTALL THE ZIP FILE AS DOWNLOADED FROM THEMEFOREST. IT WILL NOT WORK. - Once you have AudioTheme installed go to Appearance → Themes
- Click the ‘Install Themes’ tab
- Click ‘Upload’
- Select the theme ZIP folder called ‘amplify-theme.zip’ and click upload.
- Once the theme has been uploaded successfully, click activate.
Setup Automatic Updates
Automatic updates will enable you to know when bug fixes and updates have been pushed by the development team, and provide a notification in the WordPress Dashboard when they are available.
Warning:
Be aware that if you have made any modifications to the CSS or PHP files and run an update, all changes will be blown away! We highly suggest if you want to make theme modifications to do so by creating a Child Theme.
- From the Dashboard of your site, go to Appearance → Theme License.
- Paste the License Key you received in the purchase email from UpThemes into the License Key field.
- Click the Activate button and Save Changes. You’re good to go, and should receive notifications when theme updates are available!
If you don’t already have a License Key, send an email to support@upthemes.com with your Envato purchase ID and we will provide a License Key.
Homepage Setup
Create Slides
- In your WordPress dashboard, go to Slides → Add New.
- Enter the content for your slide. A title and body content are optional while featured image is required for the slider to display properly.
- Note: Images should have a widescreen aspect ratio rather than portrait and be wider than 1200px at the minimum, otherwise they will be pixelated and stretched. Nobody wants pixelated, stretched images.
- Make sure to add at least two images to the slider in order to have it rotate.
Adding a Logo
Adding a logo is simple and works the same way as most WordPress themes and sites.
- From the Dashboard go to Appearance → Customize
- From the live Customizer select the Header Image section.
- From here you can Add New Image, view the changes live, and then Save changes.
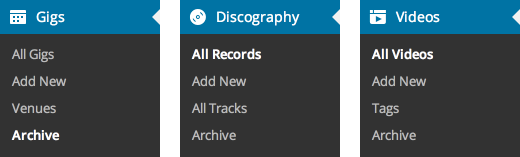
Setup AudioTheme Pages
The three main AudioTheme pages are Gigs, Discography, and Videos. The AudioTheme plugin handles these custom post-types by displaying them on Archive pages, so to get them to show up on our site we need to do a couple things.
You can access the archive pages from the Dashboard, a sub-item title ‘Archive’ will be available below Gigs, Discography, and Videos. From the Archive page you can manage the Page Title, Permalink, and add any page content you like (like a normal WordPress page).
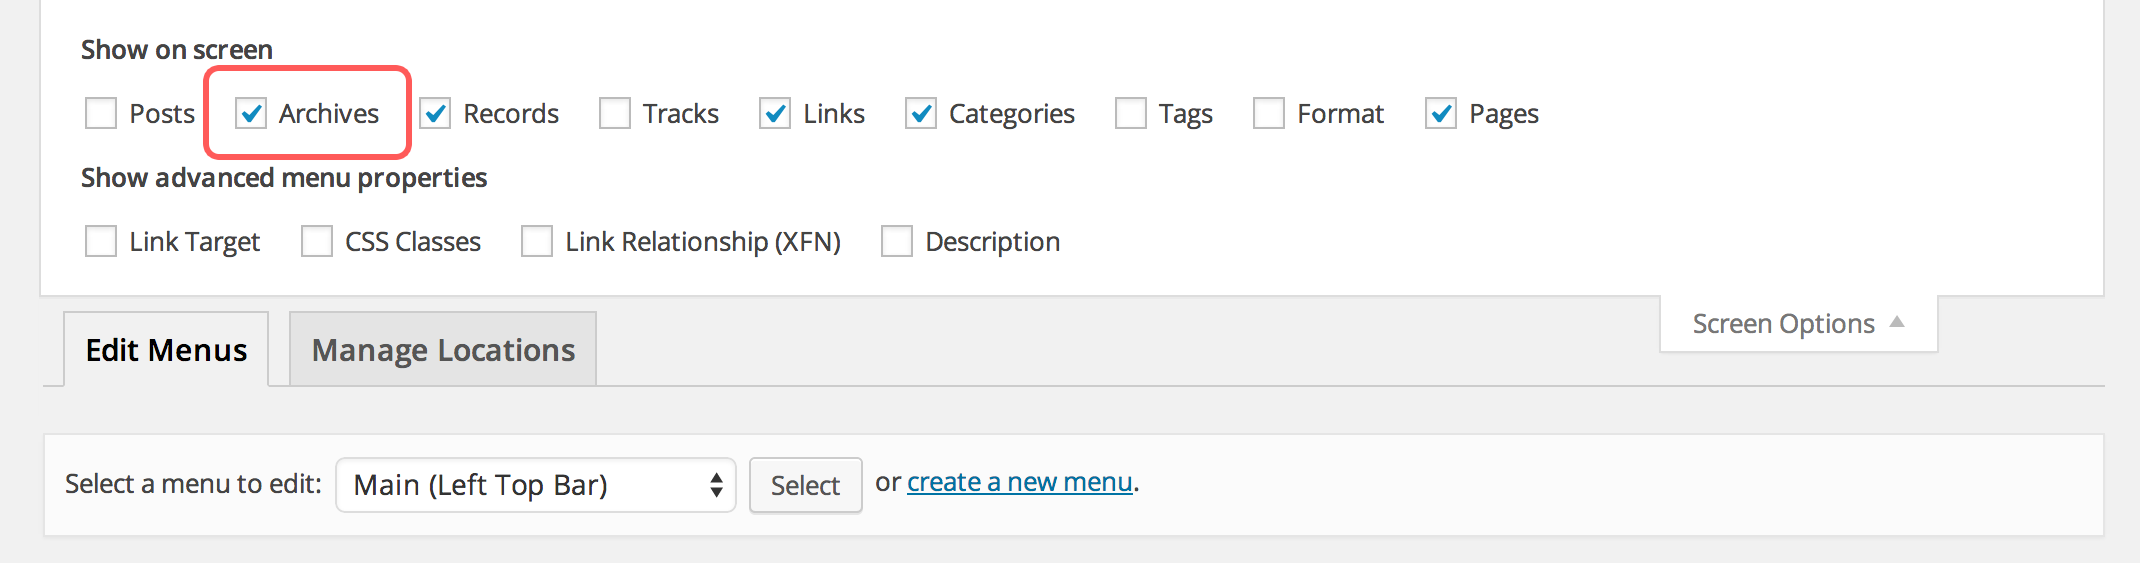
Next we need to add the Archive pages to our menu so visitors can easily access our content. To add the pages go to Appearance → Menus. If the Archive pages are not an add-able option, open the Screen Options tab in the top right corner and check the Archive checkbox.
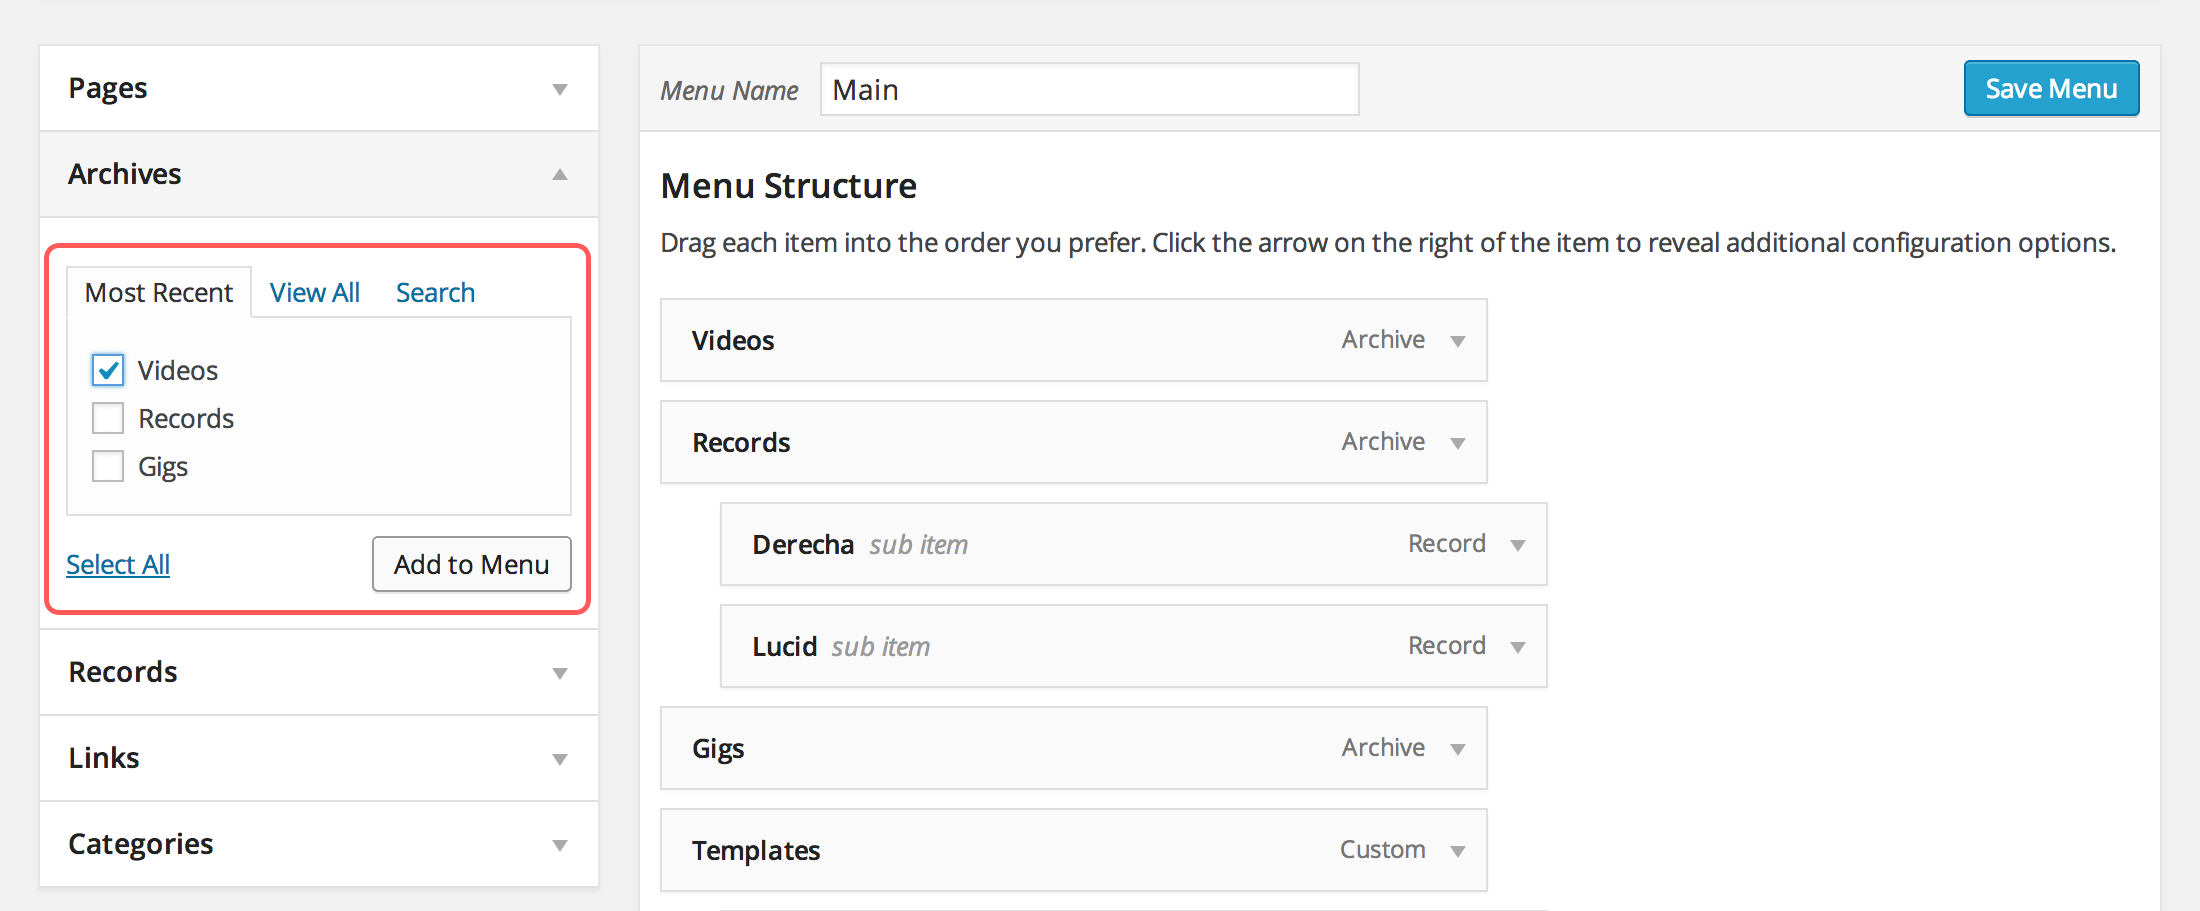
After you check the Archive box you should see an option in the Menu sidebar to add any available Archive pages. Check any pages you would like to add, click the Add to Menu button and the items will be added to the Menu system on the right. Re-order the options how you like and select Save Menu. Boom! Now have fun!
AudioTheme Features managing gigs, albums, and videos
This section explains how to set up your content using the AudioTheme plugin.
Discography
Manage your discography by uploading tracks, album art, adding links to iTunes, SoundCloud, BandCamp, and other services.
Managing Your Discography
Your discography is the window through which listeners are introduced to and discover your music. Encourage that discovery on your website through a detailed and organized history of your recorded output using the AudioTheme discography panel.
All Records
The Discography → All Records option provides an overview of your recorded music. Select an individual record to edit its details. The process of editing the details of a record are essentially the same as adding a new record. To view the elements of a record, see Discography → Add New.
Add New Record
The Discography → Add New option allows you to add a new record to your discography. Records consist of an album, a single, or a collection of singles.
It’s important to understand the relationship between records and tracks in AudioTheme. Records are collections of tracks or even just one track, so they represent albums or singles and are typically the object you will link to when promoting your music. Don’t think of them as only being albums.
For instance, if you want to promote a new digital single called “My Fabulous Song,” you would create a record called “My Fabulous Song” and also a track called “My Fabulous Song.”
Alternatively, each track in a record will also have its own permalink, so you could promote the track if your single does happen to belong to an album that has already been released. However, the design for record pages will typically be more elaborate, allowing for artwork and purchase links to multiple sites.
The elements of a record include:
Title
This is the name of your record. If your record is an album, put the album title here. If it’s a single, enter the single’s title. If you’d rather add all of your singles as a collection, then you’ll need to give that collection a name here.
Editor
Describe your album. You can write about the inspiration behind the album, the recording process, the song selection, credits for the musicians, etc.
Add Media
Use the Add Media button to attach media to your record. This might be a documentary about the recording process or promotional pictures. Don’t add your cover art here, that should be added in the featured image area. Find out more about using the Add Media button in the WordPress Codex.
Tracks
Tracks are the individual audio segments/songs you want to associate with your record. Use the Add Track button to add as many as you’d like.
- Title -Enter the title of your track/song here.
- Artist – Use this field for the track artist(s). Does the track feature a special guest? Put that here, too.
- File URL – This field lets you attach audio for streaming or download.
Record Details
Provide additional context to your records using this module.
- Release Year – Help fans differentiate between new and less new recordings.
- Artist – Use this field for the main artist of the record.
- Genre – What genre would you classify your record as?
- Type – Does your record consist of an album or single(s)?
- Links – This allows you to link to any additional resources. For example, if you want to direct fans to download your album on Amazon, enter “Amazon” in the text field and put the web address to your record on Amazon in the URL field. Add as many resources as you’d like using the Add URL button.
Featured Image
Use the featured image section to add cover art to your record. It’s likely this will be used in various place in your theme, so it’s best to upload high quality images. Find out more about setting featured images in the WordPress Codex.
When you’re done adding a record, press the Publish button to make it available on your site. If you’re not ready to publish, or want to finish updating your record later, press the Save Draft to privately save your progress. You can access your drafts at a later time through the Discography → All Records option.
All Tracks
The Discography → All Tracks option provides an overview of every track you have added and allows you to filter the tracks by record.
Select an individual track to edit.
Editing a track here allows you to add even more details. For instance, you can allow downloads of your audio files or add lyrics to the main editing area.
Gig Manager
Showcase your next tour with the Gig Manager. Simply add all the upcoming dates, ticket prices/links, locations, and venues and AudioTheme will automagically display a map for each gig.
If you’re a touring musician, it’s likely gigs are the lifeblood of your business. The AudioTheme gig panel allows you to manage and share the details of those gigs: dates, times, venues, ticket pricing, tour information, and a brief description.
All Gigs
The Gigs → All Gigs option provides an overview of your current and past gigs. You can even save potential gigs as drafts and publish them at a later date.
Select an individual gig to view and edit its details. The process of editing the details of a gig are essentially the same as adding a new gig. To view the elements of a gig, see Gigs → Add New.
Add New Gig
So you just booked a new gig; share the details with your fans using the Gigs → Add New option. Oh, and congrats on the new gig!
The elements of a gig in AudioTheme include:
Title
Is your gig part of a branded tour, showcase, or festival? Is it a special event or a benefit concert? Share that here (eg: SXSW Showcase).
Date
What month/day/year is your gig?
Time
What time do you take the stage?
Venue
Enter the venue where your gig is scheduled. If a venue is already in your database it will appear in a dropdown as you start typing.
Any time you add a new venue in AudioTheme, you’ll be asked to select a time zone. Time zones are represented by cities within them, so it may be necessary to search the list for the city closest to a venue. Time zones are important so time calculations can be performed and fans in other regions can subscribe to your gigs, especially for shows that span multiple states or even countries when touring. To add or edit additional venue information, see Gigs → Venues.
Try adding venues on the Add New Venue screen before they’re needed when adding a gig. After you type the venue’s city, a dropdown should appear that will help auto-complete the time zone.
Note
Enter a description of the gig to display within the list of gigs. Who’s the opening act, special guests, etc? Keep it short.
Editor
This is where you can enter a longer description or additional details.
Add Media
Use the Add Media button to attach images, videos, or audio to the gig. Gig posters would be an example of potential media you might want to attach. Find out more about using the Add Media button in the WordPress Codex.
Tickets
This is the module for sharing ticket information.
- Price – Does it cost money to attend your gig? Share that here so there aren’t any surprises.
- Tickets URL – If tickets can be purchased online, link it up.
Featured Image
If the author of your theme built in support for featured images, you can set those here. Find out more about setting featured images in the WordPress Codex.
When you’re done adding a gig, press the Publish button to make it available on your site. If you’re not ready to publish, or want to finish updating your gig later, press the Save Draft to privately save your progress. You can access your drafts at a later time through the Gigs → All Gigs option.
All Venues
The Gigs → Venues option displays an overview of your currently added venues. Think of it as a database or address book for all the venues where you have performed, will perform, or may potentially perform in the future.
Add New Venue
To add a new venue to your database, press the Add New button at the top of your screen next to the Venues title. You’ll be presented with an empty venue form to fill out.
Venue
The venue module allows you to manage the details of the venue. This information makes it easier for your fans to find out about the venue(s) where you perform.
Any time you add a new venue in AudioTheme, you’ll be asked to select a time zone. Time zones are represented by cities within them, so it may be necessary to search the list for the city closest to a venue. Time zones are important so time calculations can be performed and fans in other regions can subscribe to your gigs, especially for shows that span multiple states or even countries when touring.
Contact
The contact module allows you to privately store the contact information of the person you communicate with at the venue.
Notes
Store any relevant information about the venue in the notes module. Can’t remember the doorman’s name? Write it down here to refer to later. Maintaining a good relationship with a venue and its staff increases your chances of being invited back.
When you’re done adding a venue press the Add New Venue button to save the changes to your database.
Archive
To learn more about setting up Archive pages, view Setup AudioTheme Pages.
Videos
Share your latest music videos or video updates easily from video sites like YouTube, Vimeo, and Viddler. Simply add the video URL and AudioTheme will grab the video thumbnail and embed the video for you.
Using the video panel, AudioTheme allows you to collect your videos from a wide variety of supported services and present them to your fans on your website.
All Videos
The Videos → All Videos option provides an overview of all the videos you have added. Select an individual video to edit its details. The process of editing the details of a video are essentially the same as adding a new video. To view the elements of a video, see Videos → Add New.
Add New Video
The Videos → Add New option allows you to add a new video to your library.
The elements of a video include:
Title
What is the title of your video? Format this any way you’d like (eg: Artist – “Video Title”).
Video URL
This is the link where you video is currently hosted. For example, if your video is on YouTube, place on YouTube link here.
Video Preview
Previous your video here. You’ll have to save a draft or publish the video before it will actually appear.
Editor
Write about your video here.
Excerpt
Depending on the theme you have activated, this is a brief expert that may appear in your list of videos. Visit the WordPress Support section to learn more about excerpts.
Tags
Tags help you link similar content together, in this case, videos. Visit the WordPress Support section to learn more about using tags.
Featured Image
This is used to set the thumbnail that will represent your video throughout your site. Make it interesting. You can choose the image through the normal process of setting or a featured image, or click the Get video thumbnail link (you’ll need to add a URL to the Video URL field for this to appear) to grab the image directly from the video service. Find out more about setting featured images in the WordPress Codex.
When you’re done adding a video, press the Publish button to make it available on your site. If you’re not ready to publish, or want to finish updating your video details later, press the Save Draft to privately save your progress. You can access your drafts at a later time through the Videos → All Videos option.
Archive
To learn more about setting up Archive pages, view Setup AudioTheme Pages.
Sitewide Jukebox
- The Amplify theme features a site-wide jukebox for your website.
- Easily select tracks you have already uploaded in the Theme Options page (Appearance → Theme Options), and the sitewide player will share them with your visitors.
- The easy to use player is fixed to the bottom of the user’s screen so visitors can continue to navigate the site and listen to your tracks.